As a former Jeep engineer, I’ve encountered many sticky situations—literally! Once, I was tasked with removing some old 3M tape from a project vehicle. My initial attempts were clumsy and resulted in paint damage, teaching me the hard way how crucial it is to approach adhesive removal with the right techniques and tools. Imagine being so close to perfection, only to realize that your car’s finish now bears the scars of your effort. The solution, however, isn’t as elusive as it seems. There are specific methods, each one more effective than the last, designed to safely remove 3M tape without compromising your car’s appearance. In this article, I’ll take you through some practical steps and strategies, gathered from personal experience and expertise, to ensure you can handle this task with confidence and precision. Let’s delve into what could be a game-changer for maintaining your vehicle’s pristine look.
Why You Need to Remove 3M Tape
Did you know that leaving old tape can lead to unsightly damage on your car’s surface? This is a lesson I learned firsthand during my early days working with Jeep vehicles. I remember a specific instance when a vehicle owner was grappling with stubborn tape residue, and their misunderstanding led to severe paint damage that could have been easily avoided. This experience taught me how crucial it is to manage issues like aging 3M tape with precision and care.
Removing 3M tape might initially seem like a trivial task, yet it’s far from that. If ignored, the residue hardens, enabling dirt and debris to cling to it, which can abrade and corrode your car’s paint. This is particularly detrimental if you ever plan to sell your vehicle, as aesthetics play a significant role in resale value. In my experience, every streak of old tape left untreated threatens to mar not only the beauty of your car but also diminish its worth.
By paying attention to these details and removing tape correctly, we can preserve our vehicles for the long haul. Understanding these risks can truly be a game-changer, shifting our approach to car care from reactive to proactive.
Who Can Benefit from This Guide

Wondering if this guide is for you? If you own a car, then yes! When I first started writing for The Autopian, I encountered readers who were frustrated with removing adhesive from their vehicles. Whether you’re a novice car owner fearing you might damage your beloved vehicle or a seasoned automotive enthusiast annoyed by the residue that stubbornly clings to your prized possession, this guide is crafted with you in mind.
I’ve spent countless hours elbow-deep in automotive puzzles, and I understand the frustration adhesive remnants can bring. My personal journey through the automotive world has shown me that understanding how to address even the smallest of issues, like removing 3M tape, can make a huge difference. This guide aims to empower everyone. With my professional experiences and industry knowledge, I’ve compiled methods that cater not only to different skill levels but also ensure the care and longevity of your vehicle’s appearance. Let’s dive into the nuances and discover how to easily tackle this common yet challenging task.
When to Remove 3M Tape
Timing is everything—when should you tackle that tape? Let’s find out!
In the world of automotive care, timing can make all the difference. I remember a time during my engineering days when I waited too long to remove some old tape from a Jeep. The summer sun baked it on, making it even tougher to remove. That experience taught me an invaluable lesson: Don’t wait too long! Timing plays a crucial role in efficiently removing 3M tape from your car. Acting sooner rather than later not only saves you considerable hassle but also preserves your car’s finish. UV rays and temperature fluctuations can cause the adhesive to harden and become more challenging to remove over time, taking advantage of window periods where you might face less adhesive resistance.
The ideal moment to remove 3M tape is when the tape is still relatively fresh—before it’s had ample opportunity to bond irreversibly to the paint or materials beneath. If you find yourself dealing with aged or stubborn tape, tackle it during cooler parts of the day to minimize damage or difficulty. By choosing the right time, you’re setting yourself up for success.
Where to Find the Best Tools
Not all tools are created equal—do you know which ones work best for adhesive removal? As an engineer, I’ve tested numerous tools for tape removal, and let me tell you, the outcomes can vary dramatically. You might think any sharp object or chemical cleaner will do, but that assumption could lead to costly mistakes.
When I was working on a project involving 3M tape, I discovered that it truly pays off to invest time in researching the right equipment beforehand. I once used a heat gun that worked wonders, but it only proved effective on specific types of tape. For the average car owner, this knowledge isn’t just handy—it’s essential.
You’ll want to start by visiting automotive supply stores, both online and brick-and-mortar. Websites like Amazon and AutoZone offer a range of specialized adhesive removers and detailing tools. Don’t underestimate the value of reading user reviews and watching tutorials, as they often reveal how certain tools perform in real-world situations.
In my experience, having the right tools at your disposal makes all the difference. You’re not just saving time; you’re preventing potential damage to your vehicle’s finish. So, before you begin the adhesive removal journey, ensure you’re well-equipped with tools favored by professionals. Trust me, it’s worth every bit of research.
How to Effectively Remove 3M Tape
Preparation Steps

Preparation is key—are you ready to protect your car’s surface? When it comes to removing 3M tape, skimping on preparation can lead to disastrous results. I learned this the hard way when a friend ignored my advice, only to scratch his car’s paint in the process. Think of preparation as your first line of defense. Before tackling the sticky challenge of 3M tape residue, gather your tools: a soft cloth, a mild adhesive remover, and patience. Car surface protection is paramount, and starting with the right supplies can prevent unexpected damage.
Beginning the task with a gentle wipe of the area ensures that any dirt or debris is removed, minimizing the risk of scratching. Then, using the mild adhesive remover with caution allows for a smoother process, loosening the tape residue without harming the paint underneath. This method isn’t just about removal—it’s about caring for your vehicle. Your preparation reflects your dedication to maintaining your car’s aesthetic value.
Step-by-Step Methods
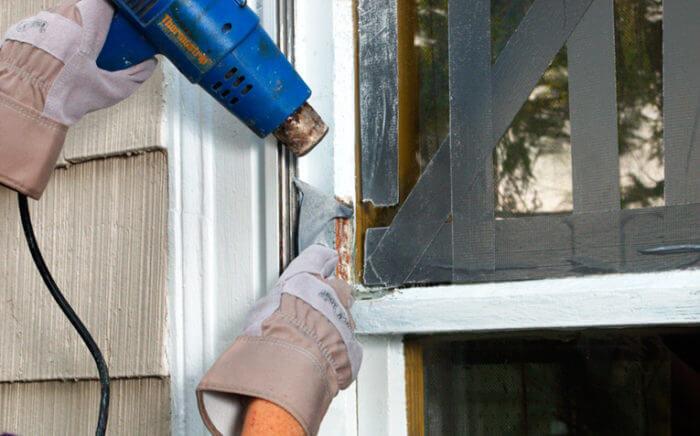
Ready to dive into the steps? The right methods can make or break your removal process. Over the years, I’ve discovered how critical it is to approach tape removal systematically. Starting with the right tools—such as a heat gun or hairdryer to soften the adhesive—is essential. By warming the tape slightly, you can make it more pliable and less likely to damage the vehicle’s paint.
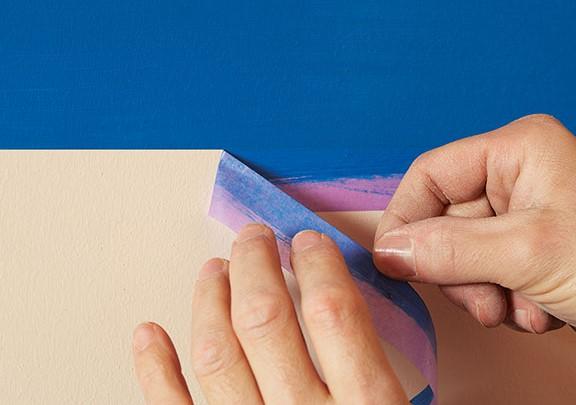
After heating, I employ my trusty trick: using dental floss or fishing line. Gently work the string between the tape and the paint surface, slicing through the adhesive. This simple yet effective method minimizes paint damage and expedites the process. For residue, I’ve found that commercial adhesive removal products or even household items like rubbing alcohol can help, but be cautious and test on a small area first to avoid paint damage.
Repetition of this process—heat, slice, and clean—ensures that the tape and its adhesive disappear without a trace. It’s a hands-on method that demands patience but guarantees results. For those looking to maintain their vehicle’s appearance, mastering these techniques is invaluable. With a bit of practice, you’ll find the best methods for removing tape easily navigable and immensely helpful.
Post-Removal Care
You’ve removed the tape, but what about the aftermath? Is your car ready for its grand reveal? In my experience, post-removal care is critical to truly polishing your vehicle’s look. Once you’ve successfully tackled the tape, a thorough cleaning of any lingering tape residue is essential. Overlooking this step can undermine all your hard work. It’s akin to finishing a masterpiece painting but neglecting to frame it. I vividly recall skipping this critical phase once, only to end up with a surface marred by adhesive remnants, detracting from my car’s overall beauty.
Car detailing goes beyond just appearance—it’s about preserving the integrity of your car’s surfaces. A meticulous wash and polish after adhesive removal can make an incredible difference, ensuring that every inch of your car shines brilliantly. From my perspective, each step after removing the tape is a testament to your dedication to maintaining true quality. By following through with these post-removal tips, you’ll elevate not only the looks but also the durability of your vehicle’s exteriors. Let’s dive deeper into these steps and truly complete the transformation of your car.
FAQs
What are the common methods for removing 3M tape from a car?
Can a hairdryer really help in removing 3M tape?
Are there specific adhesive removers recommended for cars?
What precautions should I take when removing 3M tape from my car?
How can I clean any residual adhesive left on my car after removing the tape?
Conclusion
Are you ready to tackle your tape removal challenge with newfound confidence? Reflecting on my journey, it’s rewarding to see how sharing knowledge can empower others. Just like my first experience with tape removal taught me the importance of methodical approaches, I hope this guide equips you to navigate your own challenges with ease and success. By understanding why removing 3M tape from your car is crucial and who can benefit most from this, you can strategically plan when and where to find the best tools. The detailed how-to section explains effective removal techniques, emphasizing thorough preparation and step-by-step methods. By following these guidelines, you’ll achieve optimal results and maintain your car’s pristine appearance effortlessly.